Gluten-Free Stuffed Flatbread Recipe
This gluten-free stuffed flatbread is filled with a delicious spinach and stracchino cheese filling, but you can obviously modify it to use any ingredients you have available and that you like.
The gluten-free dough works beautifully: you can roll it out easily until it becomes very thin and assemble the flatbread without any problems. It’s then cooked in a pan until it becomes golden and crispy.
- Preparation time: 45 minutes
- Cooking time: 30 minutes
- Total time: 1 hour and 15 minutes
Servings: 4 large piadinas


Ingredients for Gluten-Free Stuffed Flatbreads
- olive oil as needed
- carrot, shallot, and celery, finely chopped for a generous soffritto.
- 300/400 g of washed spinach (you can also use frozen)
- 1 package of stracchino cheese
- 100 g of grated Parmesan cheese
- salt and pepper to taste
Gluten-free dough:
- 12 g of psyllium husk powder
- 240 g of lukewarm water
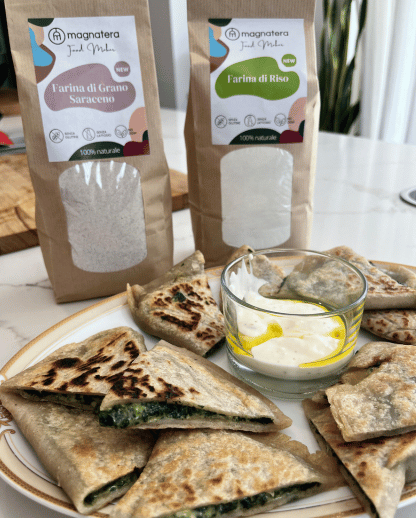
- 100g rice flour + 35g buckwheat flour @magnatera
- 75 g corn starch or potato starch
- 10 g granulated sugar
- 4 g (¾ teaspoon) salt
- 2 tablespoons olive oil
Preparing the Gluten-Free Flatbread Filling
Heat a pan over medium heat.
Add olive oil and the chopped carrots, shallot, and celery. Season with salt and cook, stirring occasionally, until softened and caramelized.
Add the spinach and cover the pan with a lid. Cook over medium heat, stirring occasionally, until the spinach is completely wilted. Uncover the pan and cook for another 1-2 minutes, until most of the moisture released by the spinach has evaporated.
Let it cool completely at room temperature and then squeeze it using a colander before transferring to a large bowl.
Add the stracchino cheese, grated cheese, salt, and pepper to the squeezed spinach and mix well until you get a homogeneous mixture. Taste and adjust the salt. Set aside until ready to use.
Preparing the Gluten-Free Flatbread Dough
You can knead by hand or with a stand mixer fitted with a dough hook.
First, prepare the psyllium gel by placing the psyllium husks and lukewarm water in a bowl. After about 30-45 seconds, a gel will form. (If there are any lumps left, you can blend with an immersion blender).
In another large bowl (or in the bowl of a stand mixer, if using) mix together the flours, starch, sugar, and salt.
Add the olive oil to the psyllium gel and mix well, then add this gel to the dry ingredients. Knead everything until you get a smooth and elastic dough that pulls away from the sides of the bowl (it shouldn’t be too sticky to the touch).
Assembling the Gluten-Free Flatbreads
Pour the dough onto a lightly floured surface and divide it into equal portions. You can use a scale to ensure they all have the same weight.
Shape the pieces of dough into balls and cover them with plastic wrap to prevent them from drying out.
On a lightly floured surface, roll out a ball of dough into a large oval, about 20×30 cm. It will be quite thin, about 1-2 mm. Moisten the edge of one half of the oval with a little water using your fingertips (this will help seal the filling and prevent it from leaking during cooking).
Spread the filling evenly on one half of the oval, leaving about 1-1.5 cm of free edge.
Fold the other half of the oval over the filling. Gently pat the surface to release any trapped air and then press with your fingertips along the edges to seal well.
Repeat the process with the rest of the dough balls and filling. Cover the shaped piadinas with plastic wrap to prevent them from drying out.
Cooking the Gluten-Free Flatbreads
Heat a pan over medium heat and, once hot, add about 1 tablespoon of olive oil. (You can adjust the heat during cooking, depending on how quickly the piadinas are browning.)
Cook the piadinas over medium heat for about 3-4 minutes per side or until both sides are well browned and crispy.
Flip again and cook for about 1 minute, to get a crispy crust on both sides.
Transfer the cooked piadinas to a wire rack.
For optimal crispiness, consume them immediately while still hot.
Cut them into easy-to-grab wedges and serve with some yogurt sauce or hummus for dipping. You can also let them cool until they’re warm or room temperature, but keep in mind they won’t be as crispy. However, the flavor of the filling is actually more intense if you eat them at room temperature.
This gluten-free dish keeps well even until the next day in a closed container in the refrigerator.
You can reheat it in a hot pan or in an air fryer or horizontal toaster for a few minutes… it will become even crispier than on the first day!
Enjoy your meal!